Use Nginx Reverse Proxy to forward request to your Docker app
Introduction
Very often, we have a lot of Dockerized applications running on different ports on our server. While some of the applications may offer automatic domain name binding and SSL generation, but most of them are not.
In this post, we are going to use Nginx Reverse Proxy function to forward request to our Docker application, and use Let's Encrypt to generate a SSL certificate for our website.
Prerequisites
Before you begin with this tutorial, please make sure you have the following:
- A domain name (i.e., mywebsite.com)
- Dockerized app (or any other app) running on certain port (i.e., port 3000)
- Nginx installed
In this example, we are going to map https://demo.lchenghui.com to 123.233.61.13:3000
(1) Point domain DNS to server IP
We need to point our domain name to the server IP by adding an A Record in our domain management site.
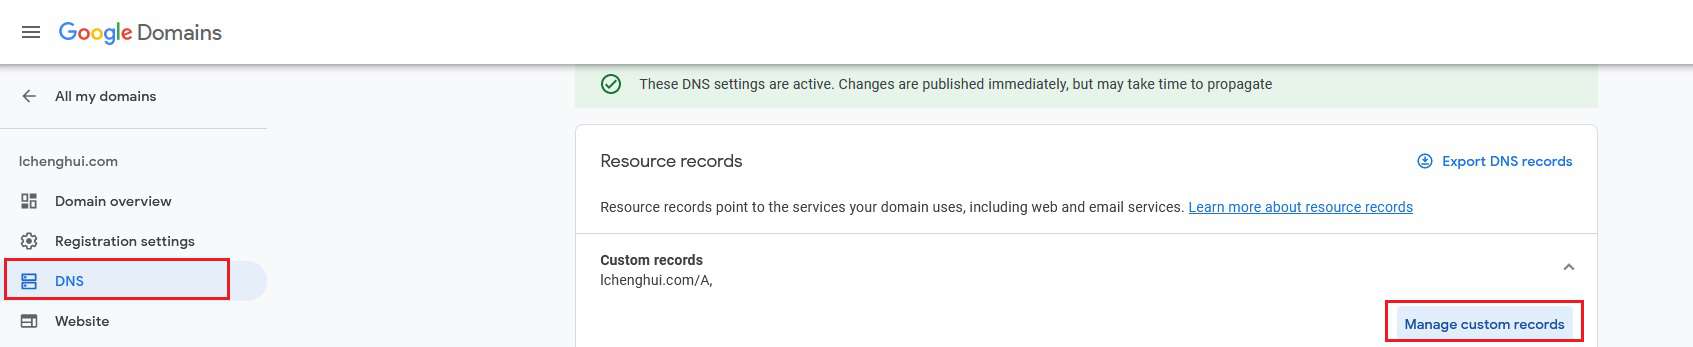
Take Google Domains as an example, head over to DNS settings, Custom records, Manage Custom Records. Then add a new A Record that points to the server IP. TTL can be any or leave it default.

Quick Tips: If you want to point lchenghui.com instead, then fill in @ or leave it blank.
(2) Setup Nginx Reverse Proxy
First go to the Nginx sites-available path
cd /etc/nginx/sites-available/
Create a new file to store the configuration
touch demo
Edit the file
nano demo
# You can edit the file using any text editor that you prefer, for instance vim
# vi demo
Then paste the following text into the demo file. You will need to change the server_name and proxy_pass.
server {
  server_name demo.lchenghui.com; # Change this to your website;
    location / {
      proxy_redirect off;
      proxy_pass http://127.0.0.1:3000; # Change this port to others if you want
      proxy_set_header Upgrade $http_upgrade;
      proxy_set_header Connection "upgrade";
      proxy_set_header Host $host;
      proxy_set_header X-Real-IP $remote_addr; # Show real IP of the requester in the log file (if any)
      proxy_set_header X-Forwarded-For $proxy_add_x_forwarded_for;
    }
}
Exit nano application by pressing CTRL + x, then press Y to save the file.
For vim users, type
:wqto exit the editor.
Next we need to create a symbolic link to Nginx sites-enabled folder. Symbolic link allows us to reflect the changes that we made on the file in a different path.
For example, if you add a new line in /etc/nginx/sites-available/demo, the new changes will be reflected in /etc/nginx/sites-enabled/demo too.
To create a symbolic link
sudo ln -s /etc/nginx/sites-available/demo /etc/nginx/sites-enabled/demo
You can then view the symbolic link created using the following command
cd /etc/nginx/sites-enabled/
ls -l
Before proceeding to the next step, it is good to test the Nginx configuration file
nginx -t

Quick Tips: In nginx, configuration files in sites-enabled folder will directly affect the content shown in our website. So it is a good practice to modify files in sites-available folder and create a symbolic link to sites-enabled folder.
(3) Let's Encrypt HTTPS
Even without enabling HTTPS, our web application is already accessible at http://demo.lchenghui.com without adding the port.
In this part, we will be using Let's Encrypt to get a free 90 days certificate for our website. The certificate itself is renewable at zero cost.
We will use snapd to install certbot, which is a free automated tool to deploy the certificate on our website.
To update the snapd version in our system
sudo snap install core; sudo snap refresh core
Install certbot using snap
sudo snap install --classic certbot
Add certbot to path
sudo ln -s /snap/bin/certbot /usr/bin/certbot
Run certbot
sudo certbot --nginx
Follow the on-screen instructions, such as filling your email (for renewal notification), acceptance of T&C, and whether or not to forward the HTTP request to HTTPS.
Depending on whether you have selected to redirect the HTTP request to HTTPS request, you can manually add the option if you chose No.
cd /etc/nginx/sites-available/
nano demo
And paste the following sniplets at the end of the file
server {
  listen 80;

  server_name demo.lchenghui.com;
  return 301 https://demo.lchenghui.com$request_uri;

}
Lastly, restart the Nginx web server
sudo systemctl restart nginx
By now, our website is reachable via HTTPS :lock:.
Bonus (Apache Virtual Host / Caddy)
Apache Web server
The similar way can be done by using Apache2 web server or Caddy.
For Apache2, we need to enable the required modules before we can use the reverse proxy feature.
sudo a2enmod
Then type in the following modules when the program asks for which module(s) to be activated
proxy proxy_ajp proxy_http rewrite deflate headers proxy_balancer proxy_connect proxy_html
Then we need to create a new configuration file under /etc/apache2/sites-available/ with the following content
<VirtualHost *:80>
        # The ServerName directive sets the request scheme, hostname and port that
        # the server uses to identify itself. This is used when creating
        # redirection URLs. In the context of virtual hosts, the ServerName
        # specifies what hostname must appear in the request's Host: header to
        # match this virtual host. For the default virtual host (this file) this
        # value is not decisive as it is used as a last resort host regardless.
        # However, you must set it for any further virtual host explicitly.
        ServerName demo.lchenghui.com
        ServerAlias demo.lchenghui.com
        ProxyPreserveHost On
        ServerAdmin webmaster@localhost
        # DocumentRoot /var/www/html

        # Available loglevels: trace8, ..., trace1, debug, info, notice, warn,
        # error, crit, alert, emerg.
        # It is also possible to configure the loglevel for particular
        # modules, e.g.
        #LogLevel info ssl:warn
        Protocols h2 http/1.1
        ErrorLog ${APACHE_LOG_DIR}/error.log
        CustomLog ${APACHE_LOG_DIR}/access.log combined

        ProxyPass / http://0.0.0.0:3000/
        ProxyPassReverse / http://0.0.0.0:3000/

        # For most configuration files from conf-available/, which are
        # enabled or disabled at a global level, it is possible to
        # include a line for only one particular virtual host. For example the
        # following line enables the CGI configuration for this host only
        # after it has been globally disabled with "a2disconf".
        #Include conf-available/serve-cgi-bin.conf
</VirtualHost>
Then enable HTTPS using certbot
sudo certbot --apache
Don't forget to restart the web server.
sudo systemctl restart apache2
Caddy
Caddy is an awesome program that let you focus on things that are more important (i.e., building your website / application). Caddy will take care of HTTPS and request forwarding with just a few lines of commands.